
As an Amazon Associate I earn from qualifying purchases


How to Oven Dry Herbs - video
I've updated this article with a video which I hope will help you - videos are added regularly to Herb Guide TV YouTube Channel - click over to check out the channel or the Herb Guide TV section here on this site. If you have any requests, then drop me an email at Liz at the-herb-guide dot com
I wondered how to dry herbs in small quantities whilst the slower growing herbs caught up when I bought myself an Aerogarden.
I was so excited to see how quick some of them were growing!
You're supposed to keep trimming the fast growing herbs back to give the slow ones some space to grow without being overwhelmed and before you raise the grow light from its lowest setting.
The dill and thai basil romped away and I harvested and froze those as I intended to use them in sauces, pestos and the like.
The mint was third in line to begin to take over. I intended to use it as tea, so I decided I'd dry it.
I've had some success with drying herbs in the microwave, but it's easy to burn them, so I decided to oven dry herbs this time.
Set the oven to 300F, 150C, Gas Mark 2 - when it's come up to temperature, turn it off.
You can do this when you've cooked something - no need to waste the fuel by making it a special heating, just let it cool down and then do it.

You can try a sample lesson to help you decide if the Herbal Academy of New England is the right choice for you - click the link below.
Preview Lesson from the Introductory Herbal Course
As you can see, the mint is growing out of the side and the dill is poking out the front! Both very much overpowering the others.

I raised the light and saw that some of the leaves were scorched by touching the grow light as I'd left it a couple of days longer than I should to trim them back (I'd already taken a harvest off each of the dill and thai basil the previous week)

I was quite brutal cutting back the mint to within a couple of inches - just caught a handful and snipped it with the scissors.

Look at the amount I got from one cutting - the mint had only been growing for just three weeks! That's the result of the combination of hydroponics and the grow light. It's very tender as well, green and fleshy.

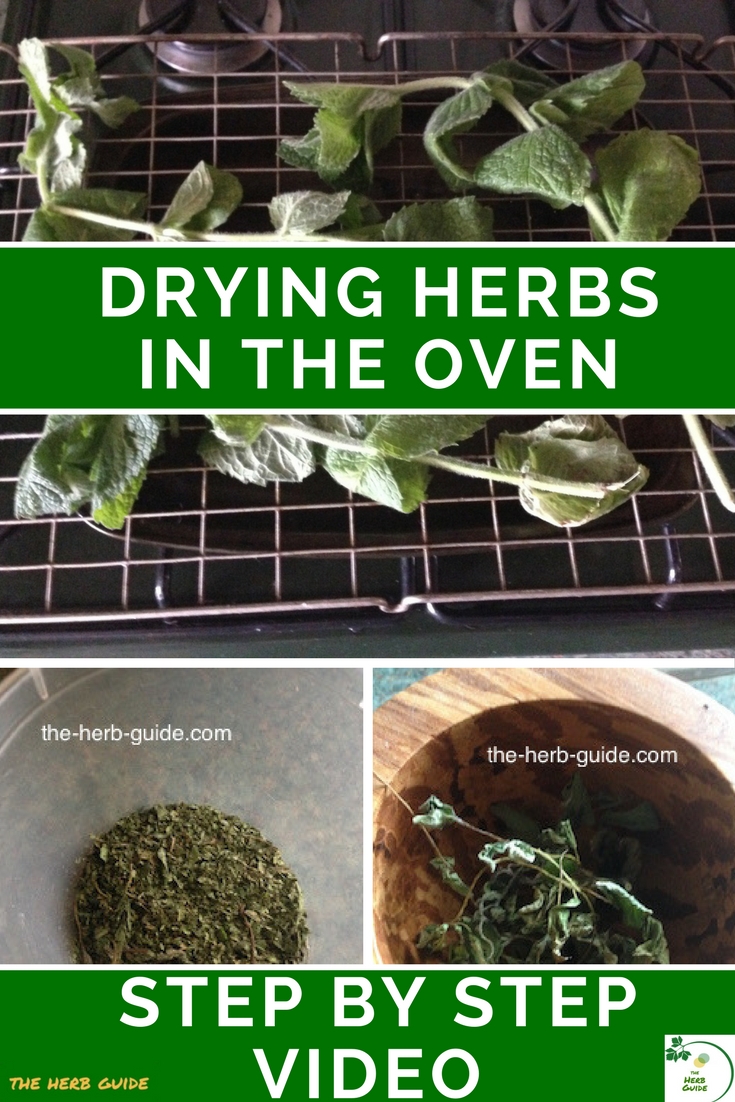
Lay a cooling rack over an oven tray and spread the herbs out evenly on the rack - use a tray underneath in case any of the herbs drop through, then you won't lose them.

Put the rack into the oven and wedge the door open slightly - I used an oven glove pushed into the hinge side (right of the photo) to keep it ajar.

Check the herbs after a couple of hours - they should be brittle but still green - there is mint scent coming from these herbs. If there's any pieces that have burned (dark brown rather than green) then discard them.

Pestle and mortar - it's pointless getting out processors or blenders for this small amount of herb - you'd lose a lot with it sticking to the goblet and what's the point of making washing up?

Put the herb into the mortar (bowl) and pound them with the pestle. You don't need to take them off the stems, just put the whole herb in. This process took literally seconds - I didn't time it, but it was less than half a minute.

You can see why you don't need to separate the leaves from the stems - they separate as you pound the herb and you can just lift them out. See how green the herb has stayed after its quick drying time.

Here's the stems - virtually stripped of all the leaves and easy to pick out of the mortar.

This is the herb after taking out the biggest stems - there are some tiny bits left, but they won't matter if you're going to use the mint for tea. I put the herb into either a plunger pot which takes the leaves to the bottom or you can use a muslin bag that is reusable.

I'm using a small polythene pot to store the mint in. It doesn't matter too much what you use so long as it's airtight - if you keep it in a dark cupboard, then light won't affect the herb.

That handful of mint has made around 4 teaspoons of dried herb - enough for four cups of mint tea made with my own herbs :-)

Write on the tub so that you know what it is at a glance - dried herbs do look very much alike.
The following week, I had to trim back again as the plant had grown to the light so, got another handful of mint.
This is how to oven dry herbs in small quantities - it doesn't matter if you've got them from indoors or out, got some left from a packet you've bought at the supermarket - the method is the same.
How to oven dry herbs - a great way of drying small quantities.
This video shows you how easy it is to get a result in an hour or two instead of leaving bunches of herbs hanging around for weeks.
Check out the Herb Guide TV YouTube Channel where a new video is uploaded every week.
Get in touch if you'd like us to cover something special.
I may receive a commission if you purchase something mentioned in this post. See more details here This will not affect the amount you pay.


